Home » Resources » Design Based on Your Users’ Needs
As a company that designs and develops mobile apps, we’re always interested in understanding and achieving objectives. These are both the objectives of our clients – their business objectives, and the objectives of our clients’ clients’ – the end users’ objectives. Further on we’ll go through the process we use to design apps based on the user’s objectives.
To exemplify the topics covered throughout the article, we’ll use the X Factor app we have recently created.
Define Business and User Objectives
Just as thinking outside the box requires us to first determine what that box is, the same goes for designing for the user and defining what that user wants to do and what motivates them to do it.
As mentioned before, we’ll be talking about the X Factor app. In a broad sense, our users would be a part of the people who watch the show on TV. Their main goal, besides being entertained, of course, is to help their favorite contestant win… or at least come as close to winning as possible. They can do this by voting and by telling other people to vote.
What about the company that’s actually paying us? What are their goals? What they want is to create engagement, to get more people watching, talking about and interacting with the show. They want people to pay attention to what’s happening and to have a strong opinion about who should win. The reason for this is that opinions create conversations and conversations increase engagement and awareness around the subject.
Now we know what the business and the user objectives are and, fortunately, they tend to overlap somewhat.
watch the show – increasing ratings makes sponsors happy
vote – increase engagement
share votes – increase awareness and engagement
get people talking – increase engagement
Translate the Objectives into Features
Now that we know why we’re building something, let’s talk about what we’re building.
Live Stream
While watching the show, most people will probably sit on a couch in front of a TV, but that’s probably not true for everyone. Because of this, one of the main features of the app will be a live streaming service, available to all users while the show is on.
App users get to watch the show on the go and the businesses sponsoring the show get more people to see their brand and services.
Voting
One of the more important aspects however is voting. Obviously, we’ll give people the ability to vote using the app, but is there something else this feature would imply?
We also want to know who is voting, to avoid cheating, so we’ll need people to identify as being unique, somehow. The easiest way we’ve found of doing this is by having them connect with their Facebook account, so that means we have a login. Obviously, we also need them to have someone to vote for, so we’ll be listing contestants.
In addition, we want to make it as easy as possible for them to vote for the contestants that are currently on the show, so we’ll need a filter of some sort. They might also want to learn a little more about the people they’re voting for, so maybe we should offer a short description about each contestant and maybe even a few photos or a short video showing their performance.
Sharing
Another thing we wanted people to do is start conversations about the show outside the app. We had to give them a conversation starter and, fortunately, we had just the thing.
We gave people the choice to share their option to Facebook after they voted and, at the same time, we wanted to help their friends make the right choice as well. That’s where deep linking comes in. It terms of features this means that the contestant details page needs to change based on the person who sees it. If you’ve clicked on a friend’s link, we want to remind you that your friend has voted for this person and perhaps you should do so as well.
Sketch Out the Screens
Now that we have the basics of what we’re building and we know why we need them, we can move on to rough sketches, taking into account how users would experience the content and features.
These tend to be really rough sketches outlining the screens to bring in some essential visual thinking to the design process.
The essential information
What were the users doing before they started using your app?
How did they hear about it?
What motivated them to open it? What are they trying to achieve?
Do they have the app installed?
How do they navigate to achieve their goal?
What else might interest them?
In our case, the answers were
Our users were watching the show on TV and they were delighted by a performance
One of the judges mentioned they can vote by using the show’s app
They want to help their favorite contestant win by voting for them
They don’t have the app installed
We’re sketching this part
We believe they may want to be reminded when the next show starts and that they want to increase the chances of their favorite contestant winning by asking their friends to vote for them
Remember to discuss these screens with others, at the very least your coworkers… preferably the ones who don’t really know much about the project. After all, your users won’t really have you there to explain why you made certain decisions.
What we’ve discovered in this case is that we may also want to fit a popup that asks users if they want to rate the app after they’ve voted, while they’re at an emotional high.
Depending on the client, we may also discuss these sketches directly with them, but sometimes we prefer talking after we can show them some more detailed wireframes.
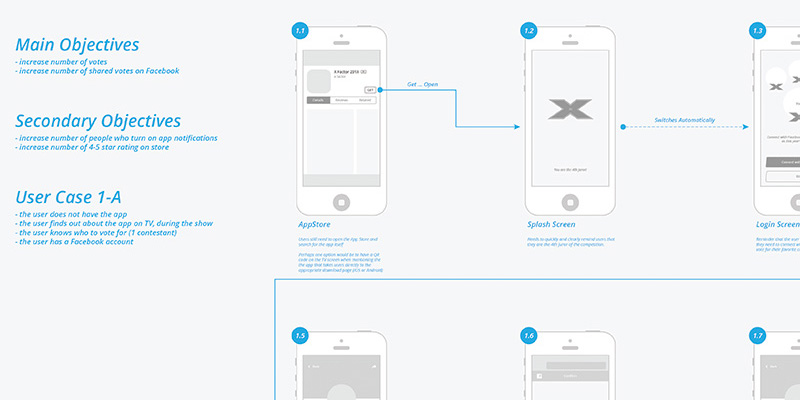
Moving to Wireframes
Once we’ve got a rough idea of the layout of the screens and how people would navigate between them, we refine them into wireframes, generally created in Adobe Illustrator either from scratch or by using elements from previously created wireframes.
The main idea is to get a better understanding of the layout of each screen and to add any additional comments and observations related to them in such a way that we can present them to a client.
You can check out the full size wireframe on Dribbble.
These wireframes are subject to quite a few changes and as such, there’s little to no emphasis placed on the visual style.
We may show these to people who don’t know about the project, to see if they understand what we’re trying to achieve and, under certain circumstances, we may even create partial wireframe prototypes using inVision to share with others and learn from the experience.
From here on, it’s all about visual guides and iterations on high-fidelity mockups but that’s a discussion for another time.
So many startups fail because they are working for months on a product without testing or getting any feedback from their users. They launch the product only to quickly realize their solution is not…
Just like in fairy tales, mReady started after one night’s dream: A mobile Ready Romania created by a team of Product, Design & Development experts and visionaries. The wild beginnings Passionate…